If I inspired you, I've done my job!
Showing posts with label RRR. Show all posts

May 09, 2011

Checkerboard of days

Rain and sunshine, and rain again—
Calendar page of checkerboard days…

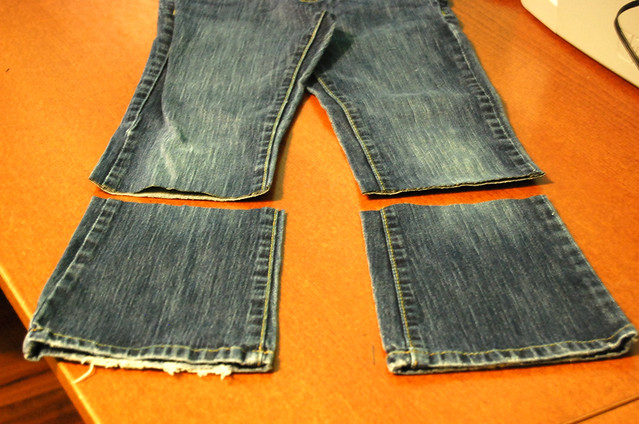
This timeless pattern have had inspired many creative minds. I'm one of the them and this time I'm using it to re-design an old pair of jean pants that are neither full length nor capri any longer for my daughter.

As my previous clothing re-desing post, this technique does not require a sewing machine. Tools you will need are scissors and needle. And measuring tape, of course.

1. Cut the bell bottoms off
2. Fold the edges measuring 2˝ heigh
3. Cut half way up—1˝—every 3/4˝
4. Unfold the edges.
5. Cut the bottoms into strips measuring 3/4˝ in width
6. String the strips through in a checkerboard pattern
7. Stitch every other 'checker' to secure the stripes in place. I did it by hand using back stitch
8. Wear as capris
…or shorts

April 20, 2011

The Bleach Experiment

A while ago I wrote about a newly discovered technique to renew clothes using bleach. I transformed a simple monotone jersey shirt into a vibrant tie-dye (in that case tie-bleach) garment.

This time I decided to repeat the experiment and I'll tell you why. I took my girls shopping for clothes the other day. I have to admit we rarely do that, but I really had a good time connecting with my daughters through chatting about their school and other silly subjects.

But purchase-wise, the trip was stressful. Despite the array of colorful outfits out there, I couldn't help but notice how overpriced kids clothes are while cheaply made. They even sell shorts that look like cut offs! Come on!

And it seems like distressed clothes trend is in now. So don't stress, distress the clothes at home.

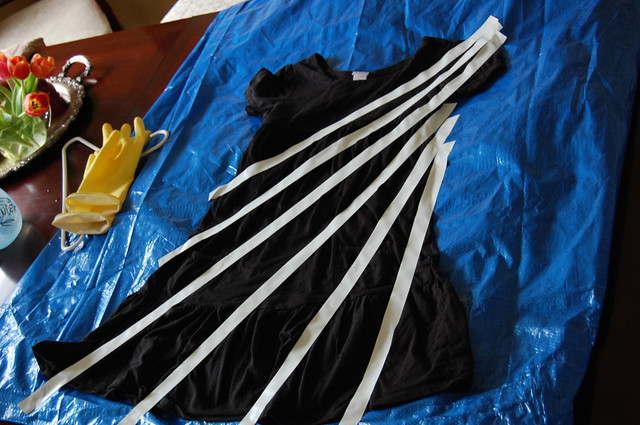
This time I'm sharing this easy yet creative technique to turn an old black dress—this was my older daughter dress before, now she can wear as a top—into antiqued striped top. You don't have to use same diagonal direction that I have, it is totally up to your imagination.

Be careful using bleach though. Use gloves, protective goggles and cover the surface with painter's plastic or tarp. And make sure the room is WELL VENTILATED, i.e. open the windows if you're working indoors. Luckily the weather permits to do so now :)

◊◊◊
You will need:

1 cup bleach
2 cups warm water
Spray bottle
Masking tape
Tarp (painter's plastic)
Cotton jersey dress/top
Fabric flower (I used the decorative daisy)—optional

Mix 2 parts water (2 cups)+1 part bleach (1 cup) in a spray bottle.

Line the surface with protective plastic (tarp). Tape a pattern of your choice on a dress with masking tape.

Spray the bleach solution on the dress. Let sit for 10 minutes or until changed to desired color.

Repeat with the back.
Air dry the dress. I ended up cutting off the bottom to make it more suitable as a top and because I didn't like the way the bleached pattern turned out on that part of the dress, but it's all up to you.
Wash in regular cycle, attach the flower (if using) and strike a pose!
I have more clothes I'm currently distressing—stress free!—so stay tuned…

April 13, 2011

Coffee Grind Art

As any parent I have my moments of hectic and sleepy mornings. Even thought I am not a coffee drinker, I must admit that a cup of java can save my day by charging me with enough energy to avoid sleepwalking while preparing lunches for the kids and arranging breakfast on the plates. However, most of the time my first cup of coffee is my last one for the day, although unfinished one. It would sit on a counter, half full, getting cold and bitter with regret of being misused.

Coffee grind is another story. I make sure I have a good use for this sandy once dry substance. I fertilize my garden and house plants with it, but sometimes it is called for something more creative.

Once I saw an instant coffee ad in a magazine with images made with coffee. So I decided to get creative and use my chocolate colored media for an art hour with my son. He wasn't going to school yet and I had to make sure he has something to do other than playing on the computer during the day. As any kid his age, my son loves to paint.
This time instead of paint that I ran out of we used glue and used dry coffee grind. It was so much fun watching as images appear after you blow the extra coffee dust away.

Besides the coffee grind we used school glue, paint brush and cardboard. We 'painted' silly images with glue and since it was white we couldn't see what is on the cardboard. Then we covered freshly 'painted' cardboard with coffee and then blew it off—coffee that stuck to brushstrokes revealed the picture.
Warning: this is a highly messy process, but what art project isn't?!

March 22, 2011

Give your pillow a second chance!

I have a confession to make—I'm a worst consumer ever! I just don't like spending money. Not because I'm cheap, but because it peeves me that I have to spend money on something I can make myself. Something like decorative throw pillows for example.

Every now and again, I am faced a dilemma: to buy or not to buy. When in comes to bed pillows, however, I do buy. Although I know that technically I would be able to make it myself, but for some reason I would splurge on a new cloud soft cushion for my head to rest upon comfortably in a nightly dream cinema. Recently, I bough two new queen size pillows since mine had flattened down and leveled with mattress.

After relatively long term servitude these faithful servants were now free from my oppression, but alas useless sitting around in my closet. I chose to give them another chance—after all what's good of a servant that's not serving? I decided to recycle them into throw pillows for my newly remodeled living room.

All I needed is a pair of fancy pillowcases that would match my living room colors. Just so happened I bought an embroidered brown curtain panel on a clearance sale to adorn my living room windows. I only found one at that time and was hoping to find its pair but never succeeded.
This curtain, too, was just laying in the closet awaiting for its destiny to unfold. Now was the time. I used this panel to make zippered removable pillow cases.
Here's what I used:
2 used flattened queen size standard pillows
1 55˝x 84˝ window panel
2 16˝ zippers of matching color

Cut the pillow open on one short side, remove the stuffing
Cut the pillowcase into square shape: fold diagonally and cut off the excess fabric
Re-stuff the pillow: use all the stuffing to make your new square pillow fluffier its old rectangular incarnation
Baste and stitch together the open end of the pillow and it's ready. Repeat with the second one.
Fold and cut the curtain fabric to the size of the pillow with one folded side and stitch together two sides leaving the third one open for the zipper. Attach the zipper. Repeat with the second pillow case.
Don't throw your old pillow away, throw them on the couch!

{Note: I had leftover material from the curtain that I will use to create two more throw pillows once I have a new retiree from the bedroom :) }

March 15, 2011

Bottles and Bands


…come together well! It doesn't rhyme but never the less they do go together!

I'm talking about those colorful bands that hold the bunches of your favorite fresh produce together. Now these stretchy ribbons will be holding oil that runs down the slick bottle glass. And if you collect enough of those colorful bands you can make nice patterns, too. Just an idea…

If only it was this easy to tame the big oil spills…

March 09, 2011

Pulp or No Pulp

Does it matter?
Yes, it does. As I mentioned earlier, everyone in my family had their own taste. Some like it hot, others—not. Some like it with pulp, others—no pulp. But it all comes together perfectly for this DIY checkers game!
All you need here is a piece of heavy cardboard, orange and green acrylic art paint and orange juice caps: orange and green (pulp/no pulp).
Paint the board in checkerboard pattern. Let it dry. Arrange the bottle caps and viola—new game.
And now let's see who wins—pulp or no pulp!

February 17, 2011

"And a peel for the wolf!"//"А для волка--кожура!"

Here's a Russian cartoon about animals sharing an orange. Everyone got a piece of it. Everyone, except the Wolf. Animals believed they tricked wolf leaving him only an orange peel. Little did the animals know--orange peel is a treasure itself!

As much as I love to eat oranges, I really don't mind ending up with orange peel. Like everything else natural, this fruit has far more uses then just being squeezed into a glass for breakfast and could be used in its entirety. So, if life gives you nothing but an orange peel, here what you can do with it:
  • Orange peel has high content of essential oil, which is highly flammable. So dried orange peel can be used for starting a fire or kindling for your fireplace;
  • I found out on the web, cats don't like orange smell. If you put orange peel next to your house plants, your feline won't chew on it;
  • My friend, who is lucky to have a blender inside her kitchen sink, purposely throws and pulverizes the orange peel in it to get rid of bad odors;
  • I don't have the pulverizer so I just scrub sink with orange peel;
  • For the same purpose--freshness--you can use orange peel to deodorize trash cans by placing the peel on the bottom of the can before lining it with bag. It can also ward off the insects during summer months;
  • If you rub oil on your skin, you can prevent mosquito bites during summer as well;
  • You can add the orange peel to home made potpourri--it's white pith is super absorbent and will absorb bad odors and humidity from the air;
  • Because of it's absorbent qualities, you can also use the peel in closets to soak up musty smell--put it in a cloth bag first; same bag can be used in a car as a air freshener;
  • It could be used in cooking, of course. With a microplane zester, peel the top layer of the orange peel--the one that does not have white pith--and use this zest in dessert or savory dishes alike to add a distinct orange flavor;
  • You can also use the whole peel to make "succades"--candied orange peel (recipe will follow, start collecting the peel);
  • If you're a drinker, you can infuse vodka and other hard liquor with orange peel, too;
  • If you're not a drinker--make some tea with dried orange peel by steeping a tablespoon of it in a cup of hot water for 5 minutes.
One thing to remember: the oranges are sprayed treated with special wax for import. Use a vegetable brush to scrub oranges even if you buy organic varieties.

=======

Помните этот мультик? Животные думали, что надурили волка, оставив ему только апельсиновую кожуру. Глупые животные не знали, что кожура сама является сокровищем!

Я люблю кушать апельсины, но не возражу, елси мне только кожура достанется. Как всё созданное природой, апельсин не только хорош для сока к завтраку а тоже может быть использовать целиком, включая его кожуру. Так что, если жизнь вам посылает только апельсиновую кожуру, то не огорчайтесь, а используйте её:


  • Из за высокого содержания в ней эфирного масла, которое легко воспламеняемо, кожуру апельсина можно использовать в качестве разжигателя или в качестве щепок для камина;
  • Я узнала из интернета, что кошки не любят запах апельсина. Если положить шкорки около домашних цветков, которые объедает ваша мурка, она к ним больше не подойдёт;
  • Моя подруга, которой посчастливилось иметь раковину с блендером, использует апельсиновую кожуру для того, чтобы избавиться от плохого запаха;
  • У меня, к сожалению такого приспособления нет, поэтому я натираю кухонную раковину шкорками для запаха;
  • Так же для запаха и свежести шкорки можно положить на дно мусорного ведра перед тем как застелить его целофаном. Запах апельсина поможет отогнать мелких насекомых, так как они не любят цитрусовые ароматы;
  • Есил потереть масляной стороной шкорки о кожу, можно даже избежать комаринных укусов летом;
  • Можно добавить апельсиновую кожуру к вашему пот пурри домашнего приготовления--белая мякоть шкорки обладает "всасывающими" свойствами и поглатит пдлохой запах и влажность из воздуха;
  • По этой же причине можно набить шкорками мешочек их грубой материи--холста, например--и поместить его в шкаф, чтобы избавиться от затхлого запаха, или же держать в салоне автомобиля в качестве освежителя.
  • Конечно же кожуру можно использовать в кулинарии. Специальной тёркой снимите цедру (это верхний слой)--не задев белую мякоть--и используйте цедру в приготовлении сладких или пикантных блюд для придания специфичного апельсинового запаха и вкуса;
  • Можно также использовать всю кожуру полностью для изготовления цукатов (рецепт будет по позже, а пока собирайте шкорку);
  • Если вы пьёте алкоголь, то можете сделать настой из шкорок с водкой или другим крепким алкогольным напитком;
  • А если вы трезвенник, сделайте чай из сухих апельсиновых корок заварив столовую ложку на стакан кипятка в течении 5 минут.
Главный момент: аппельсины опрыскивают и натирают специальным воском для перевозки. Даже если вы покупаете экологически чистые апельсины, всё равно хорошо промойте их с помошью овощной щёточки.

January 03, 2011

Put yourself together, I meant put it together yourself


Let us say, your 4-year-old boy is obsessed with cars and you are obsessed with periodicals. Periodicals are obsessed with advertisement. Advertisement obsessed with cars. Here comes the Logic: rip off the car adds and make something new and useful for your son to obsess. How about puzzles?? Most four year olds love puzzles until they figure out life is a big puzzle itself. Great! New useful obsession for your little braniac! Moreover, new obsession for you: cutting things with Exacto knife! (Quite stress relieving)

What can be used:

-Magazine ads (with any pretty picture)—someone paid for this, so might as well use it up before trashing it!

-Cardboard to paste the pretty picture on

-School glue

-Wide sticky tape to "laminate" the picture (if real lamination is available—even better)

-Exacto knife

Kids can help by cutting the picture out of the magazine and pasting on the board. Exacto works better in skilled adult hands. If not so skilled, better use scissors.

Here, I cut the board in four using simple patters for easier assembly. For older kids, try more intricate puzzle pattern of your choice.

Cut+glue+laminate+slice=new puzzle (Tah-dah!)

==================================

Скажем, ваш 4-х летний малыш обожает машины. Вы обожаете глянцы. Глянцы в свою очередь обожают рекламу, а реклама обожает автомобили. Отсюда вывод: реклама авто для нового и полезного предмета обожания для вашего малыша. Как насчёт пазл?? Большинство четверо леток любят собирать паззл пока не поймут, что жизнь сама как большая головоломка. Отлично! Новый, полезный предмет обожания для вашего маленького умника! А к тому же, новая страсть для мамочки: резьба ножиком (хорошо снимает стресс)


Я использовала:

-Журнальную рекламу (с красивой картинкой)—ведь кто-то платил за эту красоту, так не выкидывать же не потрепав!

-Картонку, на которую клеится красивая картинка

-Широкий прозрачный скотч—чтобы «заламинировать»; если есть ламинирующая машинка—ещё лучше

-Школьный клей

-Ножик Экзакто


Дети могут вам помочь вырезая картинки из журнала и клея их на картонку. Наклеив картинку, заламинируйте её широким скотчем, а затем нарежьте на «кусочки» с помощью ножика экзакто (или ножницами). Это лучше сделать вам самой. Я нарезала свой паззл на 4 простые фрагмента, но если угодно усложнить задачку, можно нарезать на больше и более сложными линиями—вам решать!

Вырезать+приклеить+заламинировать+порезать на части=новая головоломка пазл

April 20, 2009

Tie Bleach Bright Idea

This is about how I saved the day for my second child once.

She’s a kindergartner and her teacher is very creative. She teaches kids colors by having a [color] day: on a Red day the kids have to wear something red and bring a red item to show to the class. It was a Purple day. And it fell on a Tie-Dye day for the whole school and as you have already guessed, kids had to wear a tie-dye piece of clothing. Although our teacher sent home a note that the kids could wear either something purple or tie-dye, if they choose, my daughter was quite adamant to pick between themes. I knew I needed to come up with something because chances to have something purple and tie-dye were slimmer than her waist!

Thinking process took another hour or so and then, eureka! I had an idea. I found a cotton long sleeve purple tee in my daughters’ closet and instead of a tie-dye I did tie-bleach! I tied up the t-shirt and plunged it into a bleach and water solution. Another hour past and I had a perfect tie-dye pattern on a still perfectly purple piece of clothing. I threw it in the laundry then in the dryer and, viola!—a purple tie-dye (pardon, tie-bleach) shirt.

By this time at night my daughter was seeing purple dreams so I put her shirt on a bed stand. Next morning I was THE BESTEST MOMMIE once again!

I have to say I enjoyed the experiment probably more than my daughter enjoyed her new favorite t-shirt. Next day, I went on a rampage through my kids’ closet to find stained colored cotton shirts to repeat the process again and again and again... you get the idea!