If I inspired you, I've done my job!
Showing posts with label chicken. Show all posts

June 02, 2011

I've Gotta Grilling!

Last year as we were remodeling our kitchen I was left without a stove, an oven and even without a sink. It would not be a big deal if we were fond of takeouts, but we're not. I had to improvise on a grill to create dinners. And for the sink, I had to use a garden hose suspended over the plastic container. Honestly, I loved my impromptu outdoor kitchen. It felt so primal!

I want to repeat it this year. Not the sink part, but as the temperatures rise, I have a feeling for grilling. The whole month! Last year, I have tried few dinner dished that are normally prepared on a stove top or in an oven. This time not only I will try to re-create them, add new ones, but also blog about my experiences! So stay tuned this month for dinner makeovers on a grill!
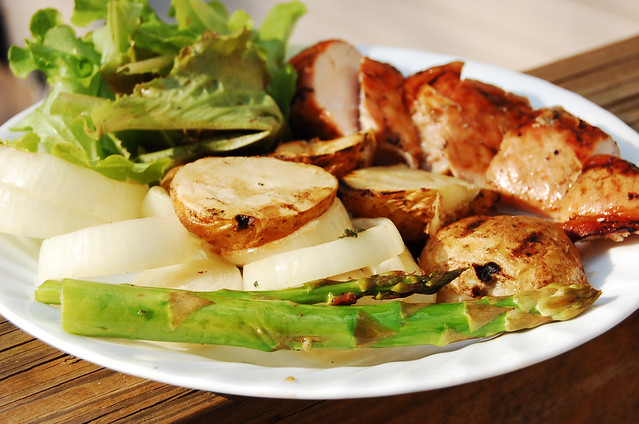
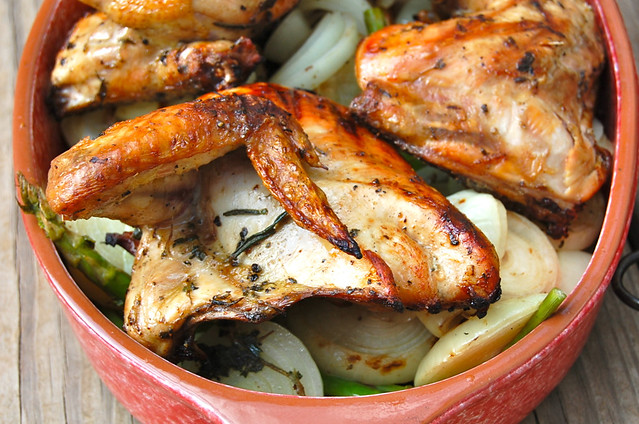
First one is my family's go to meal, herb roasted chicken. I roast chicken in the oven with onions and potatoes—the vegetable choice of my kids—and sometimes add green vegetables such as asparagus. Now, I'm grilling this roast!

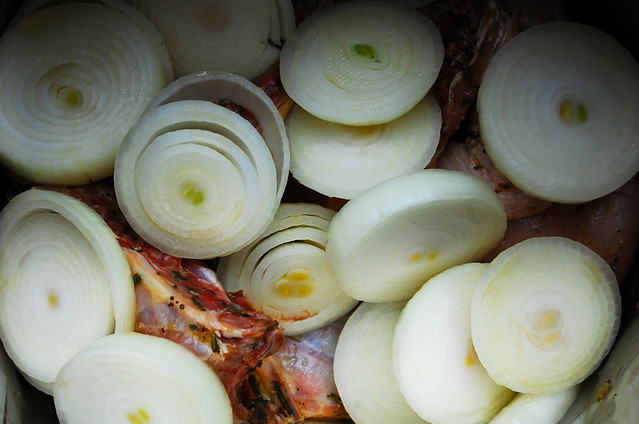
As we all know, grilling starts not with firing up a grill but with proper preparation. And by preparation I mean the process of marinading. So, I took a whole chicken, quarter it and marinaded it with fresh herbs {sage, rosemary, oregano and thyme}, garlic and onion rings. Now, I could of used the whole chicken and roasted it on a rotisserie attachment, but a) I didn't have this attachment; b) the chicken, coming from local farm, was 5 1/5 lb. I had 8 hungry people to feed!

I am not going to post a formal recipe, just a description of what I did. I couldn't even find a proper name, but it's totally irrelevant! :)
◊◊◊
Grilled Chicken With Grilled Potatoes, Onions and Asparagus
Chicken:
One medium to large {5 1/5 lb} whole chicken on a bone, skinned and cut into 4

For marinade:
Extra virgin olive oil—1/3 to 1/2 cup
Fresh herbs of your choice—1 bunch
Garlic—5-6 cloves
Black pepper corns—about a teaspoonful
Coarse sea salt—1 to 1 1/2 teaspoons

1 lb yellow onions, peeled, cut in 4 pieces across
≈≈≈
Potatoes:
2 lb yukon gold medium size potatoes, washed and cut across in halves
2 T spoon of olive oil for grilling
≈≈≈
You will need:
A wire basket
Metal skewers, enough to fit all the potatoes
Metal (grilling) tongs
≈≈≈
  • Mash herbs, pepper and salt with a mortar and pistil until all crushed. Add e/v olive oil and cover the chicken and onions. Let marinade for at least one hour.
  • You might also want to add one bunch of asparagus, although it's optional and need not to be marinated.
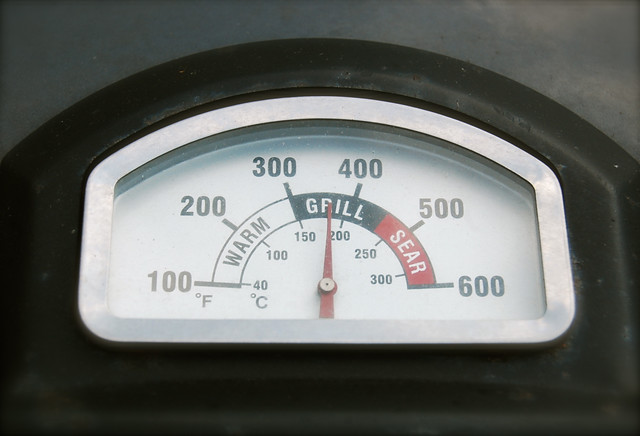
  • Preheat grill to 350°F (Grill)
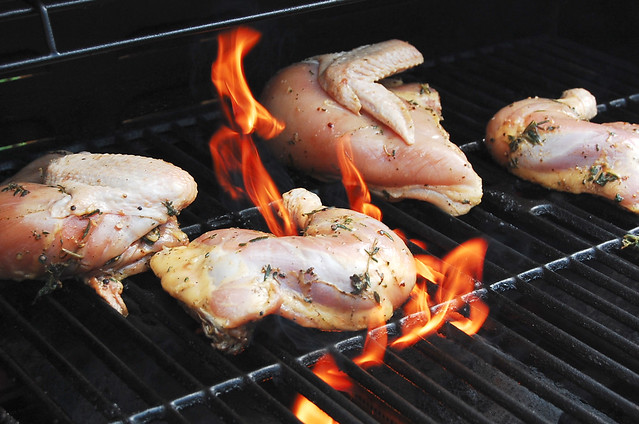
  • Arrange chicken, cover and cook for 20 minutes, keeping the temperature at 350°F.
  • Arrange potatoes on the skewers and onions and asparagus in the wire basket.
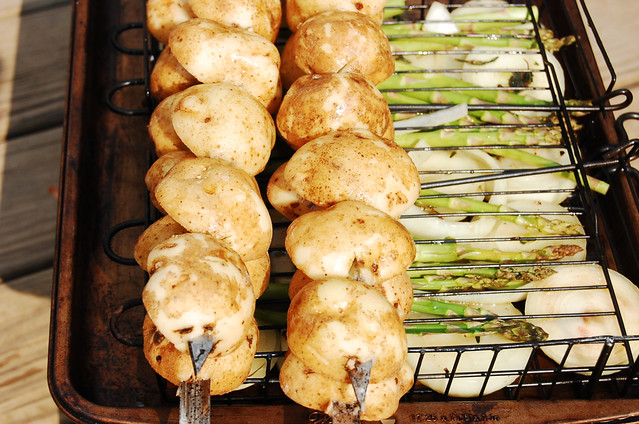
  • Flip the bird, add potatoes on the skewers to the grill, cover and cook for another 30 minutes keeping the temperature same, at 350°F.
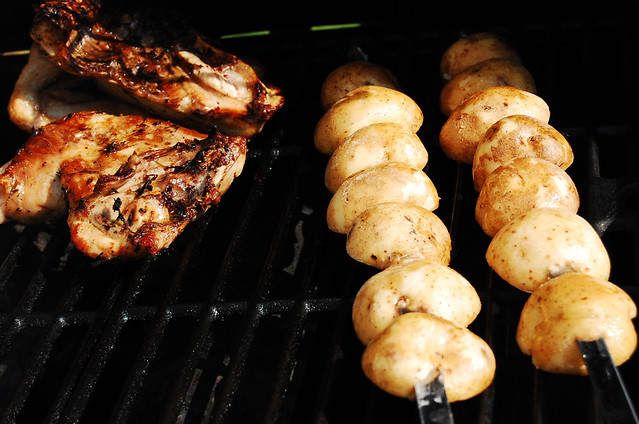
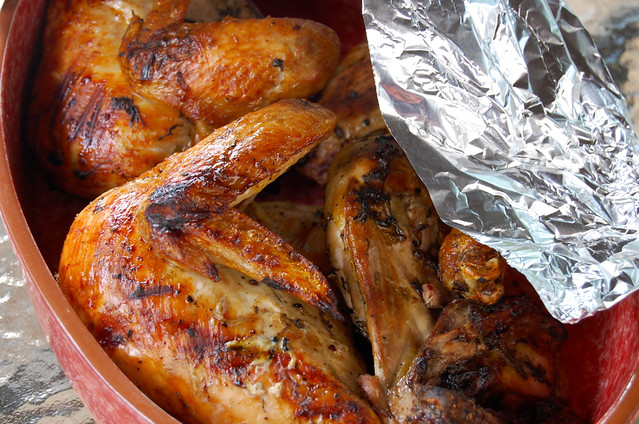
  • Check if chicken is done: it should run clear when poked, or if you have an instant read thermometer, it should read 165°F when inserted into the thickest part of the chicken. If bird is not ready, cover and cook for another 10 minutes. If it is, take it off the grill and arrange in a baking/serving dish and let it rest and re-collect all the juices under a sheet of aluminum foil.
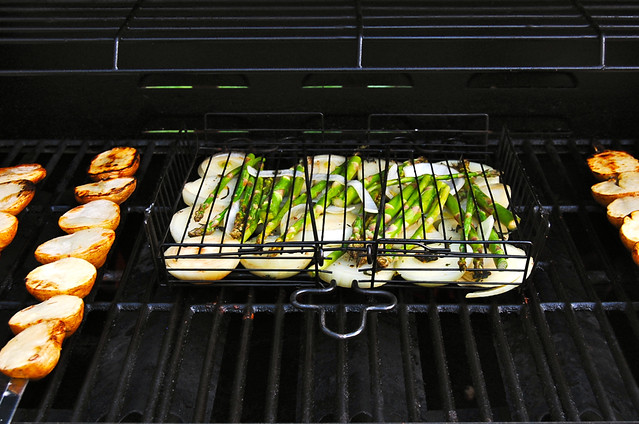
  • Put the wire basket with onions and asparagus on the grill where the bird once was and flip the potatoes. Cover and cook for another 10-15 minutes until potatoes are fully cooked. Don't overcook potatoes, they will fall apart and may even fall into the grill.
  • Once potatoes are cooked, remove the chicken from the serving dish (temporary) and arrange the vegetables on the bottom. If desired, season the vegetables with a dash of sea salt and toss.
  • Put the bird back, now on the bed of grilled potatoes, onions and asparagus. Cover with foil and let it all rest for 5 minutes until serving.
  • Cut the chicken and serve with the side of grilled vegetables and some fresh green leaf salad.
≈≈≈
I have to admit, if I was reading all this, I would probably think this is an elaborate idea. I have to assure you, however, it is very easy to prep and to grill this dish. In time it takes you to finish reading this post, your dinner could be on the table! Unless, you're a speed reader :)
Enjoy cooking and eating al-fresco!

May 14, 2011

Food Revolution Cook Off

I fist saw Jamie Oliver on Food Network in the Naked Chef show years ago. I was mesmerized by his british accent and his swiftness in the kitchen despite his looks that sell him off as a clumsy fellow. I remember he was making an herb butter, diligently pressing a pestle against a mortar's thick rims. I was hooked! The show was canceled eventually and I merely forgot about my favorite celebrity chef. You see, no matter how much I admire someone's work, be it a role in a movie, a song or a television program, I can't bring myself to follow the cult of personality—it's my backlash to years of imposed ideology of Communist Russia :) Yeah, I'm a revolutionary of some sort!

Few years later, Jamie returned to USA with a program, or rather plan, that is more mind blowing than anything he's ever done, in my humble opinion. I am talking about Jamie Oliver's Food Revolution. I suggest you check it out and join in!

The other day they have posted a recipe of a Crunchy Garlic Chicken and a facebook friend of mine suggested I participate in photo contest for this entry. So I did.

I had to deviate a little using chicken tenders in lieu of chicken breast and whole wheat Triscuitcrackers. Plus I added more parsley since my Ingredient Of the Month (IOM) are herbs. Moreover, I put the chicken on a bamboo skewer—my kids can eat [almost] anything off the stick!

So please visit the web site, sign the petition and get cooking… join the Revolution!

◊◊◊


April 15, 2011

Chicken Leeken

As I was creating my yesterday’s post, I was thinking it would be unfair to mention only chives from the big family of onions. So I decided to dedicate the rest of the recipes this month to other members of this crunchy, empowered by nutrients family.

Next performance is by the tall brother named Leek. This wonderful vegetable does not grow a bulb like its more popular brother—the onion, it remains straight, cylindrical in shape. While its white part remains mostly hidden, its neatly pleated emerald leaves crest over the ground like a green peacock tail. Layer after layer leek is wrapped with vitamins and minerals that are essential to our health. They include potassium, calcium, iron, phosphorus, magnesium, and sulfur—that is what makes eating leeks a little bit gassy.

Leek has mild onion flavor but not as astringent as scallions. While prepping the chunky stud, you might not shed any tears as you do with regular onion, but you surely will smell the essential oils that are evaporating making your sinuses open up for more! These oils contain all the vitamins: ascorbic acid (vitamin C) and niacin (vitamin B3) as well as carotene, riboflavin (vitamin B2) and thiamin (vitamin A).

Originated from South-western Asia, leeks found many uses for its talents in Mediterranean cuisine. Baked into pies, stuffed with meet or simply braised they are quite popular in Turkey and Greece.

Here is some trivia about leeks from the Internet I find interesting : Dried specimens from archaeological sites in Egypt, as well as wall carvings and drawings showed that the leek was a part of the Egyptian diet “from at least the 2nd millennium BCE onwards.” They also allude to surviving texts that show it had been also grown in Mesopotamia from the beginning of the second millennium BCE.

The leek was the favorite vegetable of the Emperor Nero, who consumed it in soup or in oil, believing it beneficial to the quality of his voice.

The leek is one of the national emblems of Wales, worn along with the daffodil (in Welsh, the daffodil is known as "Peter's Leek,") on St. David’s Day.

In Romania, the leek is also widely considered a symbol of Oltenia, a historical region in the southwestern part of the country.

This popular handsome guy hides a lot of dirt inside, however. Literally! That is why it requires detailed preparation. But it’s not hard. All you have to do is to let gravity give you a hand. Here is how:

Cut off the roots and dark green part of he leaves, this is about ½ of all the length.
Chop each stalk on bias.
Separate the layers and collect the chopped rings in the bowl. Pour cold tap water all the way to the brim and let stand for 20 minutes. All the sand will descend to the bottom. Transfer leeks into the colander (don not pour it over or the dirt will come back!) rinse, and let air dry or pat with clean absorbent towel. The crunchy rings are ready to be cooked!

And what are we cooking today? Chicken Leeken! You have probably already guessed, the inspiration comes from a familiar children's book story—Chicken Licken. One day I was reading this story to my son, amusing him with a very distinctive accent and pronouncing the short [i] sound in ‘Licken’ as long [i:] sound.

I love this dish for its simplicity and my kids love to eat it with chopsticks and ask for it often, although the memory of the story has faded away. Well, not FAR away, my son is only five!

◊◊◊
Chicken Leeken

Serves 6 to 8

1 ¾ lb chicken breast, cut in thin strips (see photo)

1 bunch leeks (about 4 medium thickness), prepared as described above
2 T spoons chopped fresh cilantro
2-3 cloves of garlic, pressed through a garlic press
1 inch cube of fresh ginger root, pressed through a garlic press
(yes, you can use this gadget here, too!)
1 teaspoon of sea salt and 1 teaspoon freshly ground black pepper
2 T spoons olive oil

2 cups uncooked white rice

  • Cook the rice in 4 cups of water with a pinch of salt.
  • Heat oil in a large skillet or wok and add chicken, garlic, ginger, salt and pepper and cook over high heat until chicken is no longer pink, stirring constantly to prevent burning.
  • Add leeks. Don’t worry if it looks like they don’t fit—the volume will reduce as you cook them. Let the leeks sweat for 20 minutes over medium-high heat, stirring occasionally.
  • Turn off the heat and add chopped cilantro.
Serve over a bed of cooked rice.
…And as the story goes, a sly fox eats Chicken Leeken along with other silly birds! Bon appetite, foxy!

March 21, 2011

Spring has sprung

On March 20th it was first a day of Spring. And even though Winter does not want to go, holding on to the last wilted leaf that was left by her dear friend Autumn, soon young Spring, accompanied by cheerful chirping of returning birds and bickering streams, followed by the parade of frolicking of emerging from slumber insects and under the awning of velvety sun rays will rightfully ascend the throne.

Despite Winter's desperate attempt to linger by covering the ground with bleak snow, plump buds on the trees are ready to burst with life and it tells me that gardening season is near. Soon, I will sink my hands into soft fertile soil preparing it to accept seeds to nurture and grow.

In many cultures around the world for many years spring represented rebirth, a new beginning. Especially for those, whose wheel of life was tuning on the endless farming fields. And of course this change of season was always met with special celebrations.

My people, Circassians, was no exclusion. Living on fertile land every spring they would begin sowing in early spring. But before they would celebrate a new year, the first day of spring, МафIэщхьэтыхь (Mafeshhetih) or Гъэрэ щIырэ щызэхэкI—Spring Equinox. These festivities included cultural rituals involving games (Adyga Jegw), dancing as well as religious customs: Circassians made an offering to their gods by slaughtering a black animal, most offten young black chickens in hope that this sacrifice will rid of bad spirits and bring a pleasant and plentiful farming season. The chicken would then be prepared in a traditional dish Djedlibje that translates to "Fried Chicken"—a creamy chicken dish.

Back in North Caucasus my mom and grandma would cook it with sour cream. When I first tried to recreate it here with sour cream, it wouldn't taste the same. Then I discovered that heavy cream in lieu of sour works much better.

We used a special spice, Djedgin—chicken powder—that was a ground powder of dry wild thyme or savory. I was able to find it here, too.

And the authentic recipe calls for whole chicken, cut into portions. I use boneless skinless breast and thighs because it's easier to eat and faster to cook.

One tradition remains unchanged: I serve this dish with pasta—an authentic Circassian spoon bread made of millet. I've posted the recipe before here.

◊◊◊
Circassian Creamy Chicken
3 lb skinless boneless chicken
(this time I used 1 1/2 lb of breast and 1 1/2 lb of boneless thighs)
1 cup finely chopped onions
3-4 garlic cloves, crushed
1 1/2 teaspoon ground savory (or thyme) divided
1 teaspoon cayenne pepper
Salt and black pepper to taste
2 TB spoons olive oil
16 oz heavy cream
1 cup cold water
1 1/2 TB spoons all purpose flour
  1. Cut chicken into 1˝x2˝ pieces, add half of ground savory, cayenne pepper, salt and pepper, mix with chicken and set aside.
  2. In a dutch oven or heavy pot heat 2 TB spoons of oil. Add chicken to it and brown it on a high heat for 5 minutes stirring frequently to prevent burning. When chicken is white and starts to turn golden brown, add onions and garlic, lower the heat to medium, cover and simmer for 20–30 minutes, stirring occasionally.
  3. Add 1 1/2 TB spoons of flour to cold water and whisk it until all flour is dissolved. Pour this water into the pot, rase heat and bring it to boil.
  4. Add cream, let it boil over the hight heat, then immediately lower the heat to low add the rest of the spices and let simmer for 10 minutes to let the sauce thicken a bit.
  5. Turn off heat, let stand for couple of minutes and serve with pasta.
Фытхъэжь!
Enjoy!

March 14, 2011

DIY Chicken Nuggets—for real!

Slowly but surely the snow continues to melt around here, revealing last year's mush of fallen leaves and un-trimmed grass. With the cheerful accompaniment of birds' chirping I'm happy to see my backyard covered with mud rather than snow and ice. The meltdown continues.

This time I'm melting down the all time, all kids' (as far as I know) favorite—chicken nuggets. Many of us, parents, already know how unhealthy pre-cooked frozen version could be so I won't go into details. First time I cooked home made nuggets was a while ago. I repeated the attempt few more times but it digressed. Because of one problem—my home made nuggets would never come out good enough for kids to make a switch. Why, oh why?!

One day, I was watching Jamie Oliver's Food Revolution, the very fist episode of his reality show in US and I realized what I was doing wrong. And it was revolutionary, indeed! However, very simple.

Fist of all, I was making them from the whole piece of chicken breast thus creating an unfamiliar texture. Kids could be very sensitive to the texture issue, you know! Second, I was baking them in the oven, thus making the outside not so crispy—another criteria that has not passed my chicken nuggets experts' judgement.

I saw Jamie pulverized chicken carcass in a food processor and then shape the nuggets/patties and then frying them in a little bit of oil—how easy is that! Plus this technique reminded me of the familiar one we use to make "Kotlets" (meat patties) out of minced/ground beef back in Russia.

So I tried the new way to make real nuggets. But instead of chicken carcass that was used in Jamie's experiment as a repellent, I used the expensive cut—chicken breast. And it worked! Passed kids approval on the spot with "so crispy", "so juicy" and "tasted just like the real ones" feedback. Clearly, the term 'real' is used very loosely here!

Here's what I did…

◊◊◊
DIY Real Chicken Nuggets
{Note 1: This recipe yields 16 pieces and I fried them in a small(er) non-stick skillet, 8 at a time. For this reason I needed to add fresh oil to the pan for the second batch. But if you have bigger frying pan, you can fry them all at once and don't need to add more oil. I used olive oil (not the extra virgin) but any vegetable light oil of your choice will do}

1 1/4 lb boneless chicken breast (about 2 breasts) extra fat trimmed
1/2 teaspoon garlic powder
1/2 teaspoon ground savory
(or any other dry herb of your choice)
1 teaspoon onion powder
1 teaspoon salt
1 teaspoon freshly ground black pepper
1/4 cup all purpose flour

2 eggs, beaten

1/2 cup Panko bread crumbs
(if you can't find it, make it yourself—see note below)
1/2 teaspoon dry savory
(or any other dry herb of your choice)
1/2 teaspoon paprika—optional, but gives a nice color

1/4 cup olive oil (+a little more if you're frying in batches)
  1. Prep chicken: Wash and pat it dry. Cut into chunks and put it in the food processor (blender) with spices: salt, pepper, savory, onion and garlic powder. Pulse two times, set aside.
  2. Prep crumbs: add savory and paprika to the bread crumbs and mix well with fork.
    {Note 2: If you can't buy Panko bread crumbs, make it by drying 2-3 white bread slices with crust cut off in 325°F oven for 10-15 minutes until the bread is dry but not toasted. Cool a little and crumb with your hands or in a food processor}
  3. Shape the balls: measure the chicken with the cookie scoop (or tablespoon) then roll in flour and shape balls; set aside.
  4. Assemble the nuggets: make a breading "station": eggs in one bowl, crumbs mix in the other. Dip a nugget ball into eggs then roll it in the crumbs, one at a time. Press with thumb to flatten the ball. After all nuggets are shaped, pop them in the fridge while you heat oil in the pan.
  5. Fry nuggets on medium-hight to high (on my electric cook top's dial it is set to 8, so it's not all the way high but close to it), 5 minutes on one side. Flip and fry 5 more minutes. Place them on a dish towel as you take them from the pan so the excess oil is absorbed.
  6. Serve with your favorite condiment—my kids gobbled them up with ketchup—and some vegetables on the side. Plain 'ol me likes it with plain 'ol sour cream :)
My little critics happily reported that I will never have to by the 'real' chicken nuggets again. For real?!

March 02, 2011

Let the melt down begin!

March is a beacon of spring. Before you know it, days will stretch out longer, sun will gain a wider angle and gain its warmth and everything will begin to melt in preparation for another rebirth.

This winter was not kidding with us and muffled up everything with snow layered in between crusty ice. Sort of like lasagna!

I'm not going to post a recipe of this yummy dish, not yet at least.

What's the big melt down? It is the one in the freezer section.

It surprises me how many people still buy frozen entrées from the grocery store. I understand that it saves time for those who are very busy, sometimes convenience doesn't pay off. And with all the information about unnecessary ingredients that compose many of these easy meals--such as sodium--people still don't want to spend a little extra time to make from scratch. Sometimes, the time required to heat this culinary parody is just enough to cook a fresh meal!

So, to get "inspired" I went to the freezer section. And I found plenty of inspiration, believe me! Most popular are the asian fried rice and noodle stir fry dishes. So today I'm posting my version of Chicken Fried Rice with vegetables.

Here's the inspiration (I took this photo with my phone camera):
By the time I cooked rice and boiled eggs (simultaneously but, of course in different pots) I was done with all the chopping. Here comes the disclaimer: I did, however, used frozen items--my mixed vegetables. But in my defense, the season is early and there's no fresh local veggies yet in our neck of the woods. Plus, frozen vegetables are not laden with any chemicals and usually frozen at their freshest, so sometimes (if not most of the time) they are much more nutritional then their out-of-season, out-of-state (or even country) "fresh" counterparts. For this recipe I used combined leftovers: mixed vegetables, sugar snap peas and broccoli and cauliflower.

I decided to omit all fancy sauces since my family likes to drizzle our fried rice with low sodium soy sauce and I serve it with hot chili sauce for myself for extra kick. I also topped the dish with some toasted sesame seeds, but it's optional, so I won't include it into the ingredient list. Along with all the "extras" from the list on the photo above, I also omitted sautéed onions.

In lieu of scrambled eggs, I used hard boiled. I chopped it with nifty (does anyone still use this word?) egg cutter. This gadget, although its name suggests only one use, is a true multitasking genius. If you don't already have it, you can't chop eggs, mushrooms, strawberries, kiwis and other semi-soft small food items into uniformed slices or chunks. Or maybe you can with your knife, but it takes more time.

When rice was ready, so was my trusty new wok--please do yourself a favor and invest in one!--it was getting warm on the stove...

◊◊◊
Wild Chicken+Veggie Fired Rice

4 hard boiled eggs, chopped
2 cups wild rice (4 cups when cooked), cooked according package directions
(in 4 cups of water, usually 1:2 ratio)
about 1 1/2 lb boneless skinless chicken breast, cut into strips
2 cups mixed frozen vegetables, slightly thawed
1 8 oz jar of roasted peppers, cut across into strips
1 small bunch scallions. chopped
2 TB olive oil
1 TB spoon low sodium soy sauce
1 t spoon red pepper flakes
salt and ground black pepper to taste


  1. First cook rice and boil eggs while you chop the rest of the ingredients;
  2. Heat olive oil in a wok over a high heat add chicken and fry until pink disappears, stirring frequently to prevent burning, about 10 minutes; flavor chicken with soy sauce, red pepper flakes, pinch of salt and a pinch of black pepper;
  3. Add vegetables, bring heat to medium-high and continue frying stirring frequently for another 8-10 minutes;
  4. When frozen vegetables are completely thawed and soft (don't overcook), add rice and continue frying over medium high heat, stirring occasionally (it's a stir-fry after all!)
  5. Lastly, add eggs and scallions and give it a nice big stir to mix everything well;
  6. Serve garnished with sesame seeds (optional) and soy and/or red hot sauce.
May be you spent a little more time then you would reheating (or as package suggest- cooking thoroughly) the frozen "inspiration" but you were in charge of your sodium intake and then some!

February 23, 2011

Georgian Chili: Chakhokhbili [Чахохбили]

What makes chili a chili? For me it's a chili pepper, of course! Or any other hot pepper. I have prepared a chili recipe to share with you, a more traditional version, but then I thought I'd share this idea first. There's a Georgian dish named Chakhokhbili (and it does rhyme with Chili!) that is prepared using chicken, tomatoes, peppers and fresh herbs. Originally, they use the whole chicken with bones. I used boneless skinless drumsticks--the dark chicken meat makes this dish very hearty. However, you can use any part of chicken. The trick is to sauté the chicken before adding everything else.
Although some variations of Chakhokhbili call for a bell or sweet pepper, I decided to use the bitter one- red hot chili (dried). To re-hydrate the peppers, I poured hot boiling water over and soaked the peppers for couple of hours. If you want to make the dish less spicy, remove the seeds. If you want it mild--just use bell pepper.

My version is quite spicy, so beware!

◊◊◊
Chakhokhbili- Spicy Chicken & Tomato Stew from Georgia


2 lb dark chicken meat, boneless and skinless
2 cups (about a pound) slices onions
2-3 closes of garlic, crushed
1 cup (about 4 oz in weight, please see photo above) re-hydrated red hot chili, chopped
2 cups chopped fresh herbs: cilantro, parsley & dill
1 (16 oz) can diced tomatoes
1 (16 oz) can crushed tomatoes
2 TB spoons tomato paste
2 TB spoons olive oil
Salt to taste
  1. Heat oil in a dutch oven or aluminum pot, add chicken and brown it on high heat for 2-3 minutes, stirring to make sure it turns golden brown on all sides;

  2. Add onions and peppers, mix and sauté on medium heat with open lid for 5-8 minutes or until onions are translucent;
  3. Add both diced and crushed tomatoes plus tomato paste, mix, cover and simmer for 30 minutes or until chicken is cooked through on medium-low heat, stirring to prevent burning;
  4. Add fresh herbs, cover, turn off heat and let stand for 5-10 minutes before serving;
  5. Serve with bread or boiled potatoes, or fire extinguisher!

January 06, 2011

Marsala Chicken with Peas and Tomatoes


This recipe was inspired by another chicken dish--Chicken Marsala. One day, I will try that recipe and share my experience. Until then, I used peas, tomatoes and some dill to make it a little more festive. Tangy tomatoes and pungent cumin are perfect compliments to sweetness of Marsala and peas. I have to tell you, anything looks better with the bright green peas! I started to love them even more!

4 medium chicken breasts, cut accross into 1/2 inch pieces
1 10 oz package frozen peas, thawed
1 16 oz can of diced tomatoes
2 cups chopped onions (1 medium onion)
2 cloves of garlic
1 bunch fresh dill
1/2 cup Marsala cooking wine*
1 teaspoon ground cumin
1 teaspoon ground coriander
1 dry chili pepper
1 teaspoon coarse sea salt
1/2 teaspoon freshly ground pepper
2 Tablespoons olive oil
1 Tablespoon butter

1. In a dutch oven heat up oil and melt butter in it. Add chicken and brown it on med-high heat until it turns slightly golden brown. Add salt, pepper, chili and dry spices. Remove chicken and set aside.

2. Add onions and garlic to the pot and sauté them until golden and translucent. Add Marsala cooking wine put the top on and let it simmer for 5 minutes to let all the flavors be absorbed by the onions.

3. Add chicken to the pot and let simmer covered until it's fully cooked, about 30 minutes.

4. Add tomatoes and peas, put the heat up and bring it to boil. Turn the heat down, add dill and let stand covered for 5 minutes.

5. Serve with a cup of cooked white rice. Bon appetite!

Serves 6 to 8 people
--
*You can use Marsala cooking wine from the condiments isle in your supermarket, or the real thing.

==================

Этот рецепт был вдохновлен другим куриным блюдом - Куриная грудинка под соусом Марсала. Как нибудь я и за него возьмусь и адаптирую, и тогда поделюсь опытом. А пока вот этот рецепт--простой, но очень нарядный и пикантный. Для этого блюда чтобы сделать его немногоболее красочным, я использовала горох, помидоры и немного укропа, ну и конечно вино Марсала. Пикантность помидор и тмина хорошо сочетается со сладостью вина и горошка. Хочу признаться, что я заново полюбила зелёный горошек--с ним всё выглядит красочнее и лучше на вкус!

4 средние куриные грудки, нарезанные поперёк на кусочки шириной в 1 см
1 пакет (300 гр) замороженного горошка, разморозить
1 банка (500 гр) нарезанных помидоров
2 чашки мелко нарезанного лука (1 средняя луковица)
2 зубчика чеснока
1 пучок свежего укропа
125 мл вина Марсала*
1 чайная ложка молотого тмина
1 чайная ложка молотого кориандра
1 сухого перца чили
1 чайную ложку крупной морской соли
Пол чайной ложки свежемолотого перца
2 столовые ложки оливкового масла
1 столовая ложка сливочного масла

1. В чугунной эмалированной кастрюле нагреть оливковое масло и растопите в нём сливочное. Добавить курицу и поджарить до коричневого цвета на низком огне, пока она не станет слегка золотистого цвета. Добавить соль, перец, чили и сухие специи. Изъять курицу и отложить в сторону.

2. Добавить лук и чеснок в кастрюлю и обжарить их до золотистого цвета или пока лук не станет полупрозрачным. Добавить вино Марсала, закрыть крышкой и тушить на медленном огне в течение 5 минут, чтобы все ароматы перемешались.

3. Вернуть курицу в кастрюлю и тушить на медленном огне с закрытой крышкой до полной готовности, около 30 минут.

4. Добавить помидоры и зеленый горошек, повысить огонь и довести докипения под закрытой крышкой. После кипения снять крышку, понизить огонь добавить укроп и дать постоятьпокрыты в течение 5 минут, опять, под закрытой крышкой.

5. Подавать с отварным белым рисом. Приятного аппетита!
На 6 до 8 порций
--
* Вино для приготовления "Марсала" можно купить в супермаркете--оно в том же ряду, где уксус. А можно использовать настоящее.