If I inspired you, I've done my job!
Showing posts with label dough. Show all posts

March 30, 2011

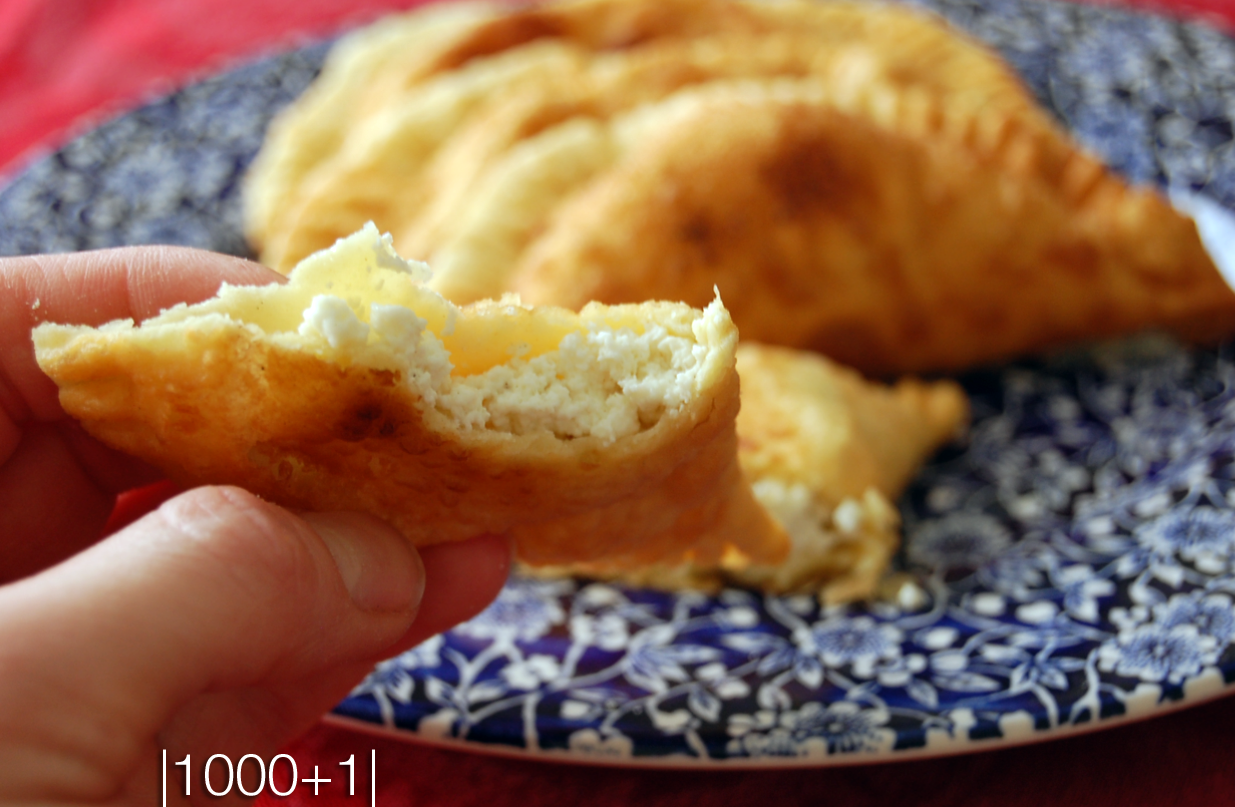
Haliva—Circassian Pierogies

Strolling through the frozen isle in my supermarket, looking for ideas for my last Meltdown for March, hoping that the weather will melt down soon, too I came across pierogies. Right next to Polish pockets full of yummy I saw Chinese dim sum and egg rolls, Italian ravioli and even Turkish borek. Then I spotted Mexican empanadas, looking so sad with a frown next to frozen empanada dough disks. It dawned on me that there is variant unleavened dough wrapped around stuffing creations, fried or boiled, in almost any cuisine. I remembered our own—haliva. Whether fried or boiled—psi haliva, or with different stuffing—cheese, potatoes, meat—they are always a special treat!
I have heard that nowadays many cooks use frozen dough to make these hot pockets (oh, boy! now the jingle from the commercial ad for “Hot Pockets” is stuck in my head) and I agree that it is quite convenient. So why not make your own and freeze them?
Unleavened dough is very easy to make. All you need is water, egg, pinch of salt and flour. To be exact:
1 cup of warm water (102° F)
1 teaspoon salt
1 large egg
3 ½ + cups all purpose flour (you can use white or whole wheat)
  1. Put salt in the water, add egg and mix it all until well combined;
  2. On a clean dry surface pile up the flour, make a well and slowly pour water+egg mixture with one hand, starting the dough with the other;
  3. Knead the dough until semi-soft and smooth, cover and let rest for about half an hour for gluten to set.
Roll the dough in batches to 1/8˝ thick and cut out circles 5 ½˝ in diameter—I used a top of a small sauce pan.
This recipe yields about 50 disks 5 ½˝ in diameter. You can make these shapes smaller or bigger, depending on how you are going to use them. We like bigger size for fried halivas. Layer parchment paper in-between the disks or flour them generously and freeze them up to one month in a zip lock bag, 10 per each package. When needed, thaw the disks at room temperature for about one hour in the bag.

Unleavened dough is very versatile. You can stuff it and fry, boil or bake. You can make ravioli, tortellini, pierories, pelmenis, empanadas, dim sum, egg rolls, manti, borek, haliva and you can even layer it to make a lasagne dish! Not to mention it makes yummy unleavened bread.

Since this time of the year for unleavened breads and vegetarian diet, I decided to make cheese haliva this time. I made my own milk cheese.

I might sound intimidating to make home made cheese, but I can assure you it is not scary at all! All you need is a gallon of milk, a cup of white distilled vinegar, and some seasoning, if you desire.

This is what you do: bring a gallon of milk to a boil in a large stockpot. Stir constantly to prevent scorching. When milk starts to foam, turn off heat and add vinegar. Let it curd for 8 to 10 minutes, add seasoning—I used 1 teaspoon of ground savory and 1 teaspoon of salt. Line a colander with cheesecloth and pour the cheese through. You can collect the whey to use it in other dough recipes or to drink—it is quite thirst quenching—by putting a large bowl under the colander. Let the whey cool and then transfer it to a jar with lid and refrigerate. What is left in colander is your homemade cheese for haliva. Set it aside as you prepare your dough.

To assemble halivas, put one tablespoon of cheese on the disk, brush the edges with water using your finger or pastry brush, turn it and pinch sides with fork. I make large pinches because I like the crunchy edge. You can also use the dough wheel but I do not have one so fork works for me.

In a large skillet, heat ½ cup of vegetable oil—any light frying oil that does not burn, I used corn oil—and fry 3-4 haliva at a time. 2 minutes on each side. Do not let it brown; the color should be gold or orange.
Transfer the pockets onto a platter lined with paper towel to soak up the excess oil. Serve with hot tea, yogurt drink, or that whey that you have collected while making cheese.

Enjoy!

{Note} If you don't like cheese you can substitute it with mashed potatoes. I know I will have to make potato version, too, just for Maya—my meat and potatoes girl!

February 01, 2011

The beet of your heart

I chose the beetroot for the first day of February for a reason. February is proclaimed a Heart Health month by American Heart Association. Read on and you will see why.

One can write an extensive thesis on medicinal propertied of this gem colored vegetable. It is recommended for prevention and treatment of anemia, hypertension, and other cardiovascular diseases.

Dark-colored varieties of beets help strengthen the capillary walls. Substances contained in its root have vasodilator, antispasmodic, anti-sclerotic and soothing effect. In addition, they facilitate the allocation of the excess fluid from the body and are needed for normal functioning of the heart. Beetroot shape itself resembles this vital organ!

Beet root crops contain 14-18% dry matter, 11-12% sugar, 1.7% protein, 5-17 mg of vitamin C. The beets also contain a small amount of carotene, vitamins B1, B2. But what gives this vegetable a special value is vitamin P, which can increase the elasticity of blood vessels, prevent multiple sclerosis and internal hemorrhage.

In addition, beet is useful for the liver. Contained in this vegetable betaine—which is also a natural dye—activates the liver cells and prevents their fatty degeneration. Beetroots contain significant amounts of pectin, which protect the body from exposure to radioactive and heavy metals (lead, strontium, etc.), contribute to the removal of cholesterol and inhibits growth of harmful microorganisms in the intestinal tract. Salts of iron, calcium, magnesium, and phosphorus, cobalt found in beets also activate the blood formation and regulate metabolism. In iron content, beets trail only to garlic.

Among all other things, beetroot is rich in organic acids that are useful for human body: malic, citric, and tartaric. It also contains minerals such as phosphorus, calcium, sulfur, and sodium.

And let us not leave out the leaves. Beet leaves contain about the same nutrients as the root, but the beet tops have more vitamin C, although less fiber.

Today, I prepared a simple lunch recipes: beetroot soup-puree—although the most traditional soup in this category would be Borsch, but its recipe I will share separately!—and pies with beet leaves and cheese.

This soup is borrowed from Turkish cuisine, where it is traditionally made from roasted beetroots.

◊◊◊

ROASTED BEET SOUP

6 medium beetroots
2 TB spoons vegetable oil
1 TB spoon unsalted butter
1 cup diced white onions
1 cup chopped carrots
1 cup chopped celery
2 t spoons ground cumin
1/2 t spoon ground red hot pepper
1 t spoon ground black pepper
1 t spoon sea salt
1-2 dry bay leaves
6 cups water or broth
bunch of fresh dill weed
sour cream (or Greek style yogurt)

  1. Heat the oven to 375°F, wrap each washed and patted dry beetroot in aluminum foil and bake for 1 hour. Remove from the oven—beets have to be tender but not overcooked—cool, peel and chop into disks.
  2. In the pot, heat oil and melt butter in it. Add the chopped vegetables: onions, carrots, celery, garlic, and sauté them for 5-7 min or until onions are translucent.
  3. Add spices (besides salt) and beets; mix and pour water or broth and bring to boil. Once boiled, add salt, turn the heat to medium-low and cook for 30 minutes.
  4. Remove from heat, take out the bay leaves, and blend with an immersion blender. Return to heat for 10 more minutes.
  5. Serve with dollop of sour cream (or yogurt) and chopped fresh dill weed.

~~◊◊◊~~

Beet leaves and cheese pies—tsakharadhiin—are traditional Osetian dish. Osetins are one of the indigenous people of North Caucasus region, and I'm 1/8th Osetian (I know it's totally irrelevant).

You may use already prepared yeast dough or buy frozen bread dough and thaw only one loaf, but I deiced to make my own using whole wheat flour; and instead of butter I used clarified butter—it gives sweet note to the pies that compliments saltiness of the cheese and tartness of greens.

Traditionally, Osetian cheese that is similar to Greek feta is used. However, Greek feta works just fine! This recipe yields 3 10 inch pies: it is Osetian tradition to bake three round pies at a time. And to serve it with sour cream and dill dip. Only I used Greek style yogurt in lieu of sour cream. I used the same dip with the beet soup, too.

◊◊◊

TSAKHARADJIN—OSETIAN BEET LEAVES AND CHEESE PIE

For the dough:

1 TB spoon dry active yeast
2 cup warm (100-110F) water, divided
1 t spoon sugar
1 TB spoon vegetable oil
1 t spoon salt
2 cups whole wheat flour
1 1/2 cup barley flour, divided (or all purpose flour)
+more for dusting the surface

For the filling:
2 cups beet leaves
1½ (20 lb) pounds feta cheese
One bunch of scallions
1 cup chopped fresh dill weed

For serving:
½ cup clarified butter (or melted butter)
Sour cream (or Greek style yogurt) with chopped dill weed

To make the dough:
  1. To 1 cup of warm water, add yeast and sugar and without mixing let stand for 10 minutes.
  2. In a bowl with 2 cups of whole-wheat flour and 1 cup of barley (or all purpose) flour, pour the water, oil, and salt; mix the sponge with a wooden spoon.
  3. On dry clean surface pour 1/2 cup of barley (or all purpose) flour, take the sponge and knead the dough until most the flour is used up; dust the dough with flour and put it back into the bowl, cover with clean kitchen towel and let stand in a warm and non drifty place for and hour. Meanwhile, prepare the filling.

To make the filling:
  1. Wash and dry the beet leaves and shop them into thin ribbons; mix it with finely chopped scallions and dill.
  2. In a separate bowl crumble the cheese, then add the greens and black pepper.
  3. Divide the filling into 3 parts and roll into ball shape.

To assemble and bake the pies:
  1. Preheat the oven to 450°F and keep cast iron skillet (of metal baking sheet) inside the oven to be heated, too.
  2. Divide the dough into tree parts. On a dusted with flour surface roll the dough with a rolling pin or stretch with hands into circles about 7/8 of an inch thick.
  3. Put the filling in the center of the dough, push it in, and gather the dough from around the edges closing in it on top. Pinch off any excess dough. With hands even out the pie. Push it into shape (10 inches in diameter) and poke a hole 1 inch in size in the middle.
  4. Transfer the pie on a hot skillet (baking sheet) and bake for 15-20 until it starts to turn light brown.
  5. Brush the pie with butter. Repeat for the second and third pie.
  6. Serve hot, cut in 6 pieces, with a sour cream (yogurt) and dill dip.

I understand that this time of year many people would prefer chocolate as their main ingredient not only because it makes a nice valentine day treat but also because its dark varieties are good for the health. I understand also that beet might not win competing for a place on your table this month because it might not look so attractive. But have you seen or tasted Cocoa au naturelle? Right, now beet doesn't look so bad!

January 28, 2011

Whey better than just pizza crust

Sorry for the poor picture snapped with my phone but I'm too exited to share this crust recipe with you and I didn't have time to take a nicer photo.

If you have leftover tomato sauce from last night's spaghetti dinner, and especially if it's a home made one, and no one in your family wants to eat pasta two days in a row (happens in mine all the time), then make this easy crust dough and use the sauce to make pizza.
You will need, however, a rather unusual ingredient--whey. I get mine from straining plain yogurt: place a strainer over a glass bowl, line it with paper towel, pour 1 cup (1/2 container) of plain yogurt, cover with a small plate and place a weigh over (the remaining yogurt in the container will do), strain the whey for few hours; or if you have a cheesecloth, put yogurt in the it and hang it over a bowl to collect the whey (this method is faster). You can use the yogurt as you use greek style thick yogurt and now you can use the whey, too.

For the dough you will need:

1 cup whey
1 cup whole wheat flour
1 cup barley flour*
1 cup all purpose flour {plus some more for dusting}
1/4 cup vegetable oil
1 Tablespoon white sugar
1 teaspoon baking soda
Pinch of salt

1. In a glass bowl mix together whey, sugar, salt, oil and baking soda.
2. In another bowl, mix together whole wheat and barley flour and stir in the whey mixture, stirring with a wooden spoon until all combines to make the "sponge".
3. On a clean and dry surface, spill one cup of all purpose flour, add the "sponge" and knead the dough with your hands until all the flour is done.
4. Cover the dough with a clean kitchen towel and let rest while you prepare the topping.

Topping must include your leftover sauce and cheese (I used 8 oz ball of fresh mozzarella) and the rest is up to you. I added Kalamata olives and fresh basil.

5. After the topping is all ready (chopped), heat the oven to 425 °F
6. Divide the dough into two pieces, dust the surface with flour and roll out the crusts 1/4 inch thick, poke some holes for air to escape.
7. Place the crusts in the preheated oven for 5 minutes. Remove and add the topping. Drizzle with olive oil and bake pizza at 425°F for 20 minutes.

I will have to repeat it again and maybe describe the process with better pictorial.
---
*The use of barley flour is not necessary. I used it because I had it on hand. You can sub it with another cup of whole wheat.