If I inspired you, I've done my job!

May 31, 2011

It's About Thyme…

…I made some cookies! With thyme…
May is bidding good-byes now, promising us lazy days of summer. So does my mini-series of recipes with herbs. I hope it inspires you to grow your own herbs, in the garden or on a window cill, and use them fresh every day, for breakfast, lunch and dinner, turning your creations into a work of art, both tasteful and healthy. Truth be told, I haven't covered all the herbs out there, but hopefully the idea of using herbs passes on.

Having presented mainly savory dishes, I'm now off to dessert: cookies!

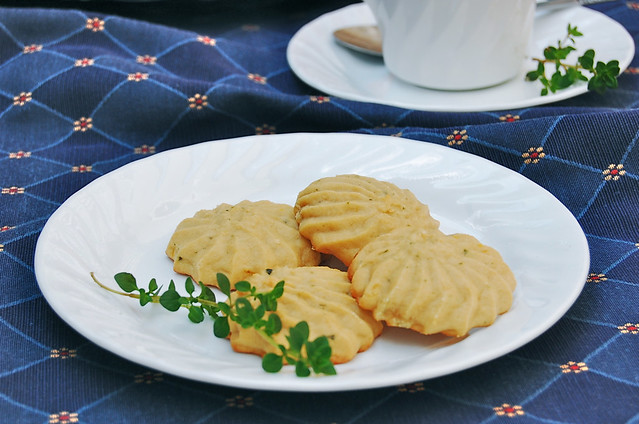
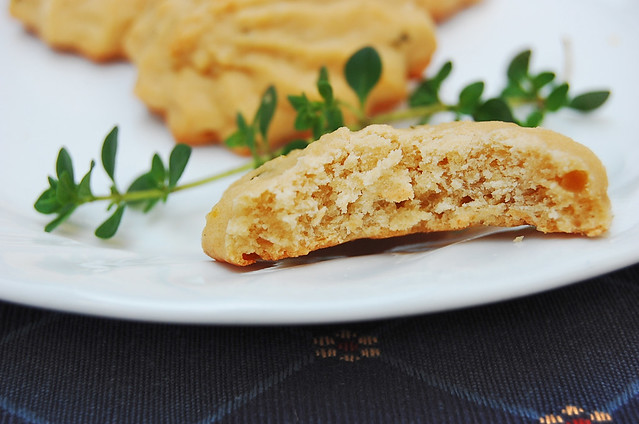
I got this idea first from my Savory Baking book. It was a recipe for Thyme and Lemon bars. Thyme and lemon is such a classic flavor combination! But I wanted to make something sweet. Then, I came across a recipe from a Russian food journal. It was a recipe for a cookie made with farmer's cheese and lemon. So I married these two to create my own variation.

I didn't use farmer's cheese, it is a bit overpriced rather than being overpraised around here. Thus, I used good 'ol whole milk Ricotta. Plus, I tuned down the lemon flavor and cranked up the thyme! The cookies came out soft and very flavorful, but not too sweet.

◊◊◊
Thyme Lemon Ricotta Cookies
Makes about 4 dozen cookies
WET
1 stick {4 oz} of unsalted butter, softened
2/3 cup packed brown sugar
2 large eggs
1 container {15 oz} whole milk ricotta cheese

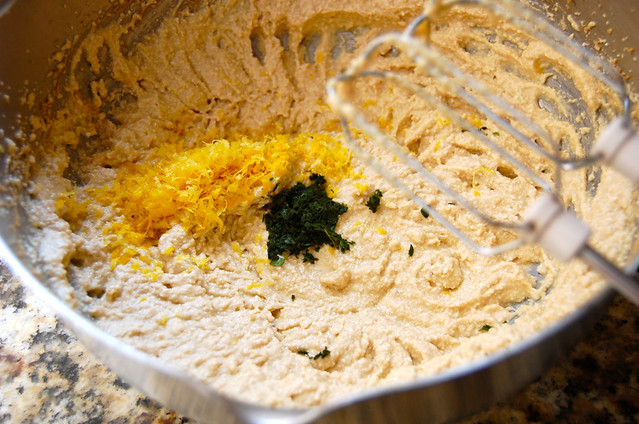
zest of 1 medium lemon {1 T spoon}
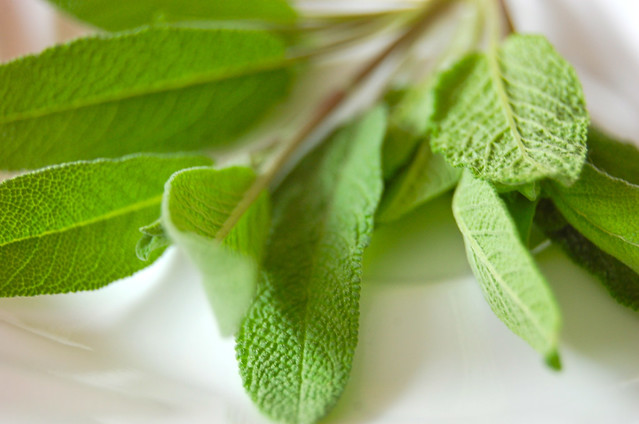
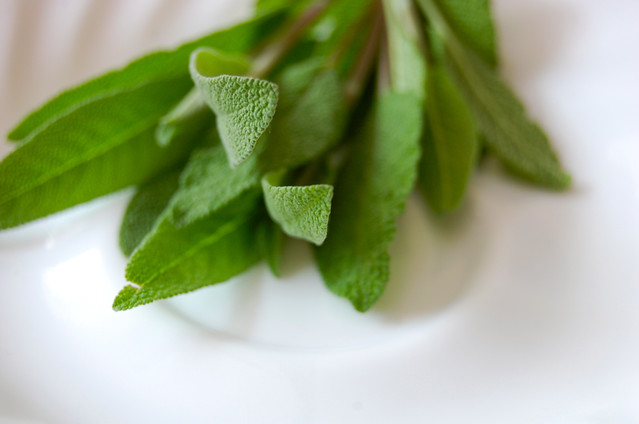
handful of thyme sprigs {10-15}
leaves stripped and mushed with mortar and pistil to make about 1 T spoons

DRY
2 1/2 cups AP flour
1 t spoon baking powder
1/2 t spoon salt

  • Preheat oven to 375° F
  • In a bowl, beat butter with sugar with an electric mixer until creamy, about 3 minutes on high speed. Beat in eggs, one at a time.
  • Add ricotta and continue. Then add lemon zest and thyme. Mix it all well with the mixer for another minute.
  • Add dry ingredients, mix the batter. The batter should be soft and creamy.
  • Place half of the batter in a pastry bag with a cookie tip and squirt about a table spoon on a prepared cookie sheet {lined with silicone liner or parchment paper} leaving 1 inch in between. Or, just spoon the batter with a spoon.
  • Bake for 15 minutes or until they turn lightly brown.
The May may be over, but the herbs are still growing, so don't forget to add them to your list of ingredients.

May 30, 2011

Gratitude

Today, I wanted to express my gratitude. With constant flow of information nowadays, this eternal virtue took shape of an bent cliché phrase, or many phrases.

Never the less, it is the Internet where I have encountered so much sincere courtesy, kindness and geniality. Most of the time from complete strangers.

Although I have started this blog in 2008 I was very timid in my beginnings. It is people from my virtual circle that have inspired me to cary on and here I am, still learning along the way!

I am utterly grateful for every click, every comment and every reply that I receive. One might find it silly, but for me the virtue of virtual kindness is very important.

Last week, I received and award, six to be exact, from a wonderful blogger, The Harried Cook. I was humbled to say the least. You can find them on my +1 Award page.

Now to sharing 7 things about myself:
  1. I am proud of my ancestry [Circassian] but wish our cuisine was more omnifarious
  2. My favorite flavor combination is sweet and sour. I don't take one without another.
  3. I always envied people who know how to play musical instruments, but never learn to play on anything but my parent's nerves :)
  4. I am forever curious, never nosy [well, maybe sometimes]
  5. My first DIY experience was a set of earrings made out of paperclips when I was 11 years old :)
  6. I still love to bend wire and bang on metal! [maybe this could be considered a musical talent?]
  7. I use smily faces way too often :) [here it comes again!] but it is only because I really do smile a lot :)
Now to the winners:
  1. The Harried Cook Marsha
  2. Roberta, with way More Thyme Than Dough
  3. Kate, cooking from Kate from Scratch
  4. Nadia, who cooks delicious meals just For The Love Of Yum
  5. Michelle, with thoughtful words of Encouragement for Moms
  6. Olga, squeezing juice from Mango & Tomato
  7. Kulsum, on her tasteful Journey Kitchen
I want to thank you for stopping by my humble blog and leaving your comments! Passing on love and awards!

May 27, 2011

An Act of Cilantropy

Before everyone gets busy with the Memorial Day festivities, I wanted to share this delicious alternative to catsup. One might find it more coarse in texture, but the splash of fresh flavor is undeniable, due to this wonderful herb called cilantro.

It is quite popular in Asian and Mexican cuisines. And I won't bore you with detailed information on the benefits of a plant with delicate fan shaped leaves. I will tell you one thing: do your taste buds—and eventually your health—a favor and try using cilantro. Practice some cilantropy towards yourself…

Cilantro leaves are so delicate and wilt fast, to keep them clean and crisp keep them in a bowl of ice cold water before cooking with it.

Plant some in your garden, or find organic cilantro in your market and try this simple recipe for a fresh home made condiment. It is generously versatile: use as a dip, or spread on burgers, kabobs, or add to pasta, hot or cold alike. The ingredient list of this spread was inspired by flavor combinations of Caucasian cuisine.

◊◊◊
Cilantro Dried Tomatoes Spread
Makes about 8 oz of pesto
1 bunch cilantro (washed and dried)

4 oz dried tomatoes
1/4 cup shelled walnuts
2 cloves of garlic
1-2 dried chili pepper, few black pepperocrns
Freshly squeezed juice of 1/2 a lime
1/2 cup extra virgin olive oil
  • Place all the ingredients in a food processor and pulverize into a uniform mass.
  • Serve it with whole wheat pita bread, on a burger, or as a dip.

May 26, 2011

What's the DILLeo?

Many of us know this spiky looking herb is for its dedication to fish and seafood dishes. However, I can assure you dill has a lot more potential. Back in the Caucasus dill is one of the most commonly used herb in any savory dish. We value dill so much we even serve it whole along with parsley, cilantro and green onions. Dill blossoms and seeds are vastly used in pickling, infusing the pickle-juice with pungent and tangy flavor.

You see, I couldn't go without mentioning my all time favorite grass. And there's more.

Many health benefits are tangled in those shaggy greens. First of all, it helps our digestive system process from the very beginning: with its essential oils, dill literally makes your water mouth and activates production of bile and stomach juices. Dill also kills bacteria that cause diarrhea and indigestion. Your breath fresheners can rest on a shelf while dill seeds and leaves can do mouth freshening jobs as well. Furthermore the essential oils of dill can end and prevent microbial infections in the mouth. Eating dill can also help with hiccups and gas.

Apart from that, the essential oils in dill are anti congestive and antihistaminic. They can help clear nasal congestion due to allergies. It can really come in handy for those suffering with seasonal allergies.

There's something more I found on the internet about dill's essential oil that I didn't know before. The flavonoids are stimulant and may stimulate secretion of certain hormones which are responsible for proper menstrual cycles.

But enough with the benefits, one can love these filigree sprigs for its fresh and appetizing flavor.

I decided to keep the tradition and use dill with fish. Or in a sauce that commonly used for fish that is.
◊◊◊
Dill Tartar Sause
Makes enough to fill a 12 oz jar (use the mayonnaise jar)
12 oz mayonnaise
1 cup finely chopped kosher dill pickles
1 cup finely chopped dill leaves
1 tspn freshly ground black pepper
A pinch of salt (the rest of the salt is in pickles)
Mix all ingredients in a bowl, cover and refrigerate for at least an hour.
That's all!
≈≈≈≈≈≈≈≈≈≈≈≈≈≈≈≈≈≈≈≈≈≈≈≈≈≈≈≈≈≈≈≈≈≈≈

Of course you can't eat the sauce by itself. That's why I'm sharing this new burger recipe. It is Tuna burger and may I say it can easily compete with its beefy counterpart (or the other way around). I found this recipe in one of the issues of Eating Well magazine and have been wanting to make it. I had to tweak it a bit, adding more tuna and less of other ingredients, just to keep it simple. I fried the burgers on a cast iron skillet with a little bit of olive oil. It took 2 minutes on each side! Quick and easy, delicious and different! Tuna burger can be a scrumptious new choice for burgers on your Memorial Day barbecue menu.

◊◊◊
Dill Tuna Burgers
Makes 6 burgers
1 12oz cans chunk light tuna in water, drained
1 cup whole wheat bread crumbs (see note)
1/3 cup mayonnaise
1 Tspn dry dill weed
1 tspn freshly ground black pepper

Olive oil for frying
6 whole wheat mini kaiser rolls
  • Break tuna into small pieces with a fork.
  • Combine tuna, bread crumbs, mayonnaise, dill weed and black pepper. Mix well until a uniform mixture forms and holds together.
  • Form 6 patties, patting the mixture with wet hands.
  • Heat the oil in the skillet, fry patties 2 minutes on each side. Be careful flipping the patties, they will be tender.
  • Smear a generous table spoon of tartar sauce on the bun, arrange the patty and top with some fresh young lettuce. Enjoy with some fries on the side, or without!
≈≈≈≈≈≈≈≈≈≈≈≈≈≈≈≈≈
≈≈≈≈≈≈≈≈≈≈≈≈≈≈≈≈≈
≈≈≈≈≈≈≈≈≈≈≈≈≈≈≈≈≈≈≈≈≈≈≈≈≈≈≈≈
{Note} To make whole wheat bread crumbs, toast 2 loaves of whole wheat pita bread in 350°F oven for 15-20 minutes, cool the toasted pita and pulverize into crumbs in a food processor.
≈≈≈≈≈≈≈≈≈≈≈≈≈≈≈≈≈
≈≈≈≈≈≈≈≈≈≈≈≈≈≈≈≈≈
≈≈≈≈≈≈≈≈≈≈≈≈≈≈≈≈≈≈≈≈≈≈≈≈≈≈≈≈

May 25, 2011

{What I'm looking forward this summer!} Almost/Wordless Wednesday

Including, but not limited to:
Herb infusions/Sun teas

Pool splash

Outdoor cooking (which means clean kitchen indoors)

Summer reading

Berry picking


Flowers

Fresh vegetables from the garden

Mama's blintzes (crepes)

Ice cream and festivals


Making jam

Butterflies

Fresh grilling

Awesome forest sunsets

Mountain Laurel Blossoms

Travel USA

Chalk Art

4th of July

Blue skies

Green grass
Dreaming

May 19, 2011

The Ageless Sage

When coming across the word Sage many people, including me, have an image of an old wise man with a long white beard. True, this is one of the definitions of this word, however I will focus on its homophone, an herb that we well know as a perfect flavor for a Thanksgiving dinner also known as Salvia Officinalis.

I would like to encourage you to plant this evergreen perennial in your garden or in a planter on your deck. You won't regret it, for it will give you its aromatic velvety green leaves almost all year long. Why would you need them all year long, if sage is mostly used during fall/winter holidays? Because with taste like this and an extensive list of benefits, I'm sure you'll be tempted to use this ageless herb not only to compliment your Thanksgiving bird.
Names Salvia and Sage derived from latin "to save" because of the herb's healing properties.

Did you know that sage is considered a Female Herb? Drinking an infusion made with fresh or dried sage leaves can regulate the menstrual cycle, may reduce irritability during PMS and relax spasms or cramps. It also helps with excessive perspiration and hot flashes during menopause. I can affirm you the first one works whereas the second one I'm yet to test on myself. These sage qualities are due to its anti-depressant and estrogenic effects. Sage can also suppress excessive lactation for nursing moms.

I personally think that the aroma of sage is very feminine, too!

Besides that, as many medicinal herbs, sage has a good effect on the digestive system as it has anti-inflamatory and antibiotic properties. It is also beneficial for the liver function.

So go ahead, turn your garden or a planter into a medicine cabinet by planting this ageless sage for years to come.

I couldn't help to brew a cup of a wonderfully aromatic infusion to brighten up my mood that is damped with all this grey rain that we're having lately.

◊◊◊
Ageless Sage Infusion
Makes one 8 oz cup
4-5 sprigs of fresh sage leaves (including the stems)
1 cup (8 oz) boiling water
1 t spoon of honey (or any other sweetener of your choice)
  • In the bottom of a tea pot or a cup, crush the leaves and stems with pestle or a spoon.
  • Pour boiling water over the crushed leaves, cover and steep for 3 to 5 minutes.
  • Strain, sweeten and indulge!

May 18, 2011

{A Glimpse of My Motherland…} Wordless/Nostalgic/Wednesday

[Долина Нарзанов//Narsan (mineral water) Valley]

[Ледник "Семёрка"//Ice Range "Seven" on a background]

May 14, 2011

Food Revolution Cook Off

I fist saw Jamie Oliver on Food Network in the Naked Chef show years ago. I was mesmerized by his british accent and his swiftness in the kitchen despite his looks that sell him off as a clumsy fellow. I remember he was making an herb butter, diligently pressing a pestle against a mortar's thick rims. I was hooked! The show was canceled eventually and I merely forgot about my favorite celebrity chef. You see, no matter how much I admire someone's work, be it a role in a movie, a song or a television program, I can't bring myself to follow the cult of personality—it's my backlash to years of imposed ideology of Communist Russia :) Yeah, I'm a revolutionary of some sort!

Few years later, Jamie returned to USA with a program, or rather plan, that is more mind blowing than anything he's ever done, in my humble opinion. I am talking about Jamie Oliver's Food Revolution. I suggest you check it out and join in!

The other day they have posted a recipe of a Crunchy Garlic Chicken and a facebook friend of mine suggested I participate in photo contest for this entry. So I did.

I had to deviate a little using chicken tenders in lieu of chicken breast and whole wheat Triscuitcrackers. Plus I added more parsley since my Ingredient Of the Month (IOM) are herbs. Moreover, I put the chicken on a bamboo skewer—my kids can eat [almost] anything off the stick!

So please visit the web site, sign the petition and get cooking… join the Revolution!

◊◊◊


May 12, 2011

Lavender green, dilly, dilly …

If you're buying herbs to plant in your garden, don't forget about lavender. Its aroma-therapeutical flowers are very popular in a holistic lifestyle. They are used in teas, baking and many other applications around the house.

But right now, there are no lavender blue flowers yet. Did you know that you can use the greens as well? I didn't until I planted lavender in my garden next to almost identically looking rosemary hence accidentally using lavender leaves instead of rosemary in a recipe. I frantically went on the internet and started researching about eating lavender green… It turned out you can use them anywhere you would use rosemary!
That is exactly what I did this time. Since rosemary goes good with lamb, I figured lavender would, too. In my humble opinion, it tasted even better!

And since we're talking about meat kebabs, which, back in the home country we call Shashlik, let me share few secrets from master meat kebab chef—my dad:
  • leg of lamb meat is the best cut to use
  • never cut meat smaller than 2˝
  • thread the meat tightly on the skewers
  • use the flat skewers—not round—they better hold meat in place
  • if meat isn't fat, add some extra virgin olive oil
  • do not marinade meat for too long, for it becomes tough when cooked
  • do not cook meat well done but rather medium well and then let it rest before serving to collect the juices back
One more point my dad makes every time he talks about shashlik is that it has to be cooked over smoking coal. On a special occasion we do exactly that, however, for a busy week night dinner we just use a shortcut—gas grill.

◊◊◊
Lavender Lamb Shish Kebabs
Makes 8 1/4 lb servings
1 handful lavender leaves (reserve the stems for rice)
2 cloves of garlic
1 teaspoon black peppercorn
1 teaspoon coarse sea salt
¼ cup extra virgin olive oil

2 lb lamb (leg meat), cut into 2˝ cubes

1. Combine first 4 ingredients in a mortar and crush them with a pestle
2. Add olive oil and mix the marinade well
3. Pour marinade over meat, refrigerate for at least 30 minutes to 1 hour.
4. Preheat gas grill to 300°—400° F (Grill) degrees
5. Thread meat on skewers (makes about 4). Cook kabobs for about 15 minutes on one side, until the outside is brown and the meat comes off the grill easily, flip and cook for another 20 minutes
6. Line a serving pan with pita bread and place hot kabob on it to rest for 5 minutes before serving.
7. Enjoy with a cup of white rice cooked with lavender stems, or served with a fresh salad on a side.

Lavender green dilly, dilly… that's all you need for now while you're waiting for the lavender blue to bloom!